challenge # 1
Welcome To Our first challenge!
We chose Explosion Boxes - as these have been SO popular and some people STILL haven't found the time to do one.. or worry that its "too hard" to do.
Im gonna wipe that theory out - and promise you that once you have done one you won't be able to stop - cos they are so darn coolio!
The measurements of this box have been edited from other sites - and can be found below in the instructions.
So the challenge is:
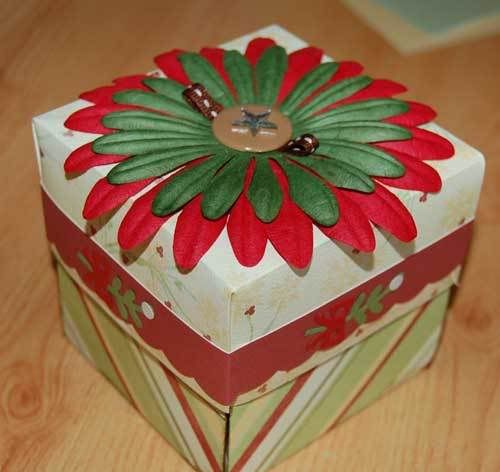
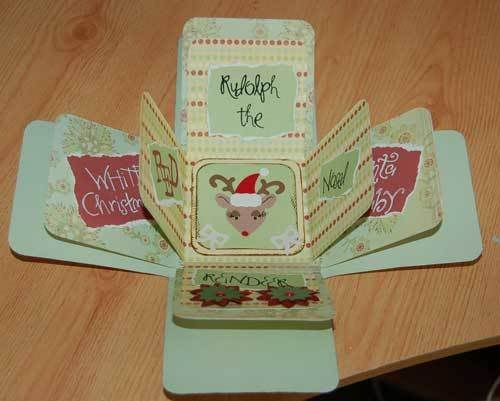
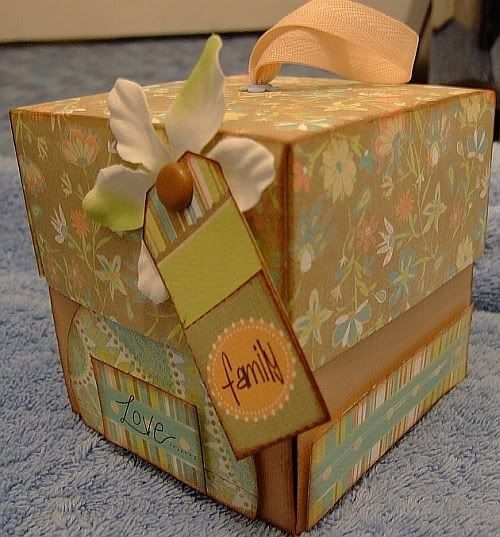
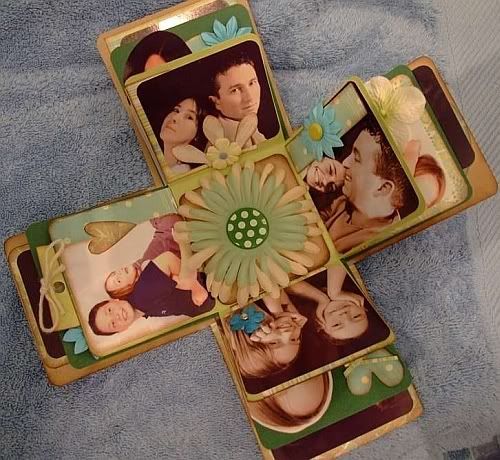
CHALLENGE: Make from scratch and fill an exploding Box -BY: 29th Dec (make before and give at christmas!!)INCLUDE: As many "bits" as you can - blooms, brads, chipboard.. make it 3D, fun and Inspirational to those you show it too!!!
Here are some step by step instructions and a slideshow to show you how...
THE BOX1: You will need a trimmer/ruler and a scorer (the old emboss tools work really well if you have one of these knocking about!) 3 sheets of bazzill, one measuring 9 x 9 inches, one 10x10 inches and one 11x11 inches. You will also need some patterned paper or card measuring 7.8 x 7.8 inches (see slide)2: First you will need to score your 9" square at 3" intervals.Always make sure you measure from each edge of the card - not from the middle.3: Now cut off the 4 edge corners to leave a cross shape (see slide)You now have your "inner" explosion.4: Now take your 10" and score at 3.3" intervals *remember to measure from each edge In - not from middle*5: Cut the four corners off leaving your cross shape. You now have your "middle" explosion6: Take your 11" square and score it at 3.6" intervals.*remember to measure from each edge In - not from middle*7: Cut the four corners off leaving your cross shape. You now have your "outer" explosion - the one you will see when the box is closed7: Glue your explosions together. - this is the base part of your box.Now for the Lid1: Take your 7.8" square - and score 2" from each edge. *see slide* You will the two inches is the "lip" of the lid. This will hold your explosions together nice and snuggly.2: once you have scored the 2" lines - score the corners diagonally (see slide)3: Pinch these corners Inwards and glue down.You now have the lid...
HERES HOW:


easy? I hope you thought so.... Scrappyfairy.co.uk have some limited edition exploding box kits, there are only two of each! so If you want one grab one today! CLICK HERE
KIMMY 'S
SARAHJANE'S
Now Its your turn... Link back and play!!!
We chose Explosion Boxes - as these have been SO popular and some people STILL haven't found the time to do one.. or worry that its "too hard" to do.
Im gonna wipe that theory out - and promise you that once you have done one you won't be able to stop - cos they are so darn coolio!
The measurements of this box have been edited from other sites - and can be found below in the instructions.
So the challenge is:
CHALLENGE: Make from scratch and fill an exploding Box -BY: 29th Dec (make before and give at christmas!!)INCLUDE: As many "bits" as you can - blooms, brads, chipboard.. make it 3D, fun and Inspirational to those you show it too!!!
Here are some step by step instructions and a slideshow to show you how...
THE BOX1: You will need a trimmer/ruler and a scorer (the old emboss tools work really well if you have one of these knocking about!) 3 sheets of bazzill, one measuring 9 x 9 inches, one 10x10 inches and one 11x11 inches. You will also need some patterned paper or card measuring 7.8 x 7.8 inches (see slide)2: First you will need to score your 9" square at 3" intervals.Always make sure you measure from each edge of the card - not from the middle.3: Now cut off the 4 edge corners to leave a cross shape (see slide)You now have your "inner" explosion.4: Now take your 10" and score at 3.3" intervals *remember to measure from each edge In - not from middle*5: Cut the four corners off leaving your cross shape. You now have your "middle" explosion6: Take your 11" square and score it at 3.6" intervals.*remember to measure from each edge In - not from middle*7: Cut the four corners off leaving your cross shape. You now have your "outer" explosion - the one you will see when the box is closed7: Glue your explosions together. - this is the base part of your box.Now for the Lid1: Take your 7.8" square - and score 2" from each edge. *see slide* You will the two inches is the "lip" of the lid. This will hold your explosions together nice and snuggly.2: once you have scored the 2" lines - score the corners diagonally (see slide)3: Pinch these corners Inwards and glue down.You now have the lid...
HERES HOW:
easy? I hope you thought so.... Scrappyfairy.co.uk have some limited edition exploding box kits, there are only two of each! so If you want one grab one today! CLICK HERE
KIMMY 'S
SARAHJANE'S
Now Its your turn... Link back and play!!!
posted by Sarahjane & Kimmy at 3:46 AM
![]()


13 Comments:
Yay!- looking forward to participating in the challenges here! I'm loving the slide step by step photos showing the 'how tos' of everything!
Congrats on going live girlies!!
xxx
Great slide show - i am soooo inspired to have a go - will have to try and make time to play!
Beautiful work, easy to follow instructions. Thanks! :)
I did leave a comment within minutes of you going live.....not sure what happened there. Can't wait to try this (have been meaning to for AGES). I love the slide show. You're both such an inspiration!
Congrats Gals... looking forward to more projects coming out!
How cool is this!!!!!!
Congratulations girls ... wonderful work ... just made my first one ... they are addictive aren't they ... the photo instructions were quite helpful ... just need to add photos and it will be done. Will spread the word on my blog and among my friends!
...this is a great tutorial...and I made two boxes already. It was so much fun!! Look here:
http://h2u6a2n6a4.blogspot.com/2006/12/more-christmas-preparations.html
I am so pleased with them!! They are different on the outside, but the pictures are the same...;-)
Wow. Those instructions are brill. Have seen a couple of these boxes, but thought they were beyond me. I am definitely going to have a go now though. thanks.
Wow - this was really good fun. Made a couple before I got it right - this was the one that worked - it's a gift for my sister - I called it an exploding sunshine box! No photos but it's designed to bring a smile to her face!
http://i73.photobucket.com/albums/i220/lambeek/Stuff/box_lid.jpg
http://i73.photobucket.com/albums/i220/lambeek/Stuff/box_open.jpg
Beautiful boxes :) and super fab instructions :) I made a couple for presents, there is one at the top of my blog and one halfway down!
Jo xx
Thanks for the challenge, loved it! Cant wait for the next one!!
http://scrappingmadloopylisa.blogspot.com/2007/01/jan-1st-2007.html
xx
I've always wanted to make an explosion box - I'm gonna give it a whirl! Love your rocking blog!!
Post a Comment
<< Home