Photobucket - Video and Image Hosting Inspiration

Thursday, May 17, 2007

Bye for now.........

Hi Guys...

You may have noticed that there is no project this month,
The reason being is that for now, we are laying fairies with tude to rest.
Both our lifestyles have changed, kimmy is very busy with DT work, and I have pregnant sponge brain...

Thanks for playing along with us over the last few months,
we hope you have been inspiried by our mini projects.
xxxxxxxxxx

Sj and Kimmy

Sunday, April 08, 2007

Challenge #5 - Mini starbook

Hello everyone! Time for another "fairies-with-tude-how-to"!
This month is a mini star book
It is so easy to make – effective – and a cute way of housing special photos etc.
Starbooks look really complicated to make - some involve stitching and all crazy sorts! = If you want a quick little effective starbook, then look no further. This is a really simple way of creating a mini photo album, and all sizes can be adjusted, increase them for a bigger book, it couldn't be easier!
You will need:
2-3 sheets A4 card = 1st colour
2-3 sheets A4 card = 2nd colour
1 sheet A5 card = any colour or patterned cardstock (off cuts)
1 ½ meter of ribbon or cord
Embellishments of choice

First you will need to cut 6 pieces of card 8cm x 16cm
Fold these in half to create a V shape
Cut 6 pieces of your second colour card 8cm x 13cm
Fold these in half to create a V shape

You are now ready to attach together. = See slide show

The front and back covers of the book are 8cm x 8cm
Cover these card squares with patterned paper (or cut 8cmx8cm from the patterned cardstock instead)
Attach ribbon between the front cover and Starbook for a neat flush finish. (see slide)
When opened out the book can be tied into a star shape
KITS COMING SOON FROM SCRAPPYFAIRY

Monday, March 05, 2007

Challenge #4

The coffee filter book


I love making these books, they look funky and are so simple and quick to make.

For a 4 page book, plus cover & back and an insert you will need:

2 sheets of 12 x 12 cardstock
Any scraps of paper you would like to use up or whole sheets (depends what you prefer)
Adhesive
Bone folder or similat
Eyelet punch (or holepunch)
Bookrings or similar fasteners
Ribbons
Various embellishments

You can order a ready made kit -->> {here}

First, print out this template (click onto the picture to make it bigger) – the measurements are just a guide, you can always make it bigger or smaller. Or if you have a coffee filter, use that one as your template (that’s what I did)


Cut out your template, place on your cardstock and trace the outline with a pencil. You can get approximately 4 “pages” from one sheet of 12 x 12.

If you would like to make a “pouch” page” which can hold inserts, you will need to draw around your template “back – to – back” (see slide show for clarification) and cut along the big outline.

Once you have cut out the “pouch page” you can either use double sided tape to seal the ends or use a sewing machine. There you have your pouch. You can use the template to make the insert, just remember that you will have to cut off a little more along the sides f the insert to make it fit.

For my book I decided on two single pages and one pouch page.

Now use a bone folder to make a “spine” for your book, this will make it easier in the end to flip your pages over, when viewing the album.
Then use an eyelet- or holepunch to prepare for fastening the pages together. You can either thread ribbon or fibres through the holes, use bookrings or a little chain as I did (see my finished book for detailed view).

I you wish, ink the edges of the pages and then start to throw all sorts of papers and embellishments onto them. You can go as wild or as simple as you like.

Enjoy!


Thursday, February 15, 2007

challenge # 3

The Purse Book:
We have decided to take a template that is usually connected with something twee and a bit fuddy=duddy and create something funky -
The purse book.
This is such a quick and easy thing to make - its perfect for an alternate to a birthday card, it even holds loose coins when closed without them falling out! (not sure if it would last a night out clubbing though....so you disco divas stick to your glitterbags!)
If you put inserts inside you can write poems, sayings, and words of love for a mini present for the ones you love.
We decided to create them in funky paper - adding ribbon and blooms to suit.
All you will have to do is click here for template A and here for template B.

You will need to resize these templates - template A needs to be the length of an A4 page to create the size we have done, and template B needs to be around just over half an A4 page in length.
As usual we have provided the slide show for your own ease - all you have to do is,

a: Cut template A out of your patterned paper - if you have double sided, this works really really well.
b:Score your lines ready for the inside of the purse.
c: Take your contrasting sheet of card and using the template as a guide, score the lines.
d: Fold corner to corner, and repeat for the other corner
e: Pinch in both sides.
f: Pinch in all four corners
g: Fold flat. (see slide show)
h: Attach the folded inserts into inside of purse covers. front and back.
i: Decorate to taste.
j: If using one of the kits from scrappyfairy - you will now be able to use your magnet fastner to the purse. if not - using something like sticky velcro works.
k: Using the square template for measurements - you can now cut 4 inserts from the rest of the patterned paper - how good is that!!! Decorate with slushy words of love and send!
Scrappyfairy is currently selling kits for these purse books here:
the Slide:


Mine and Kimmy's take on the challenge:


Monday, January 01, 2007

challenge #2

French Fries anyone???


Who would have thought that a french fries container would make it into the world of crafting?? A couple of months ago I first taught this class at the Scrapitude Cyber Crop and I have to say that these lovely little things are the quickest (and probably easiest) project to make.

Stuck for a last minute gift and a card just doesn't seem enough? Then these containers are the solution. A simple one can be finished within 20 minutes - all you need to do is fill it up with some sweets, or maybe some sample lotions, tokens - the possibilties are endless and you will get addicted to making these babies.

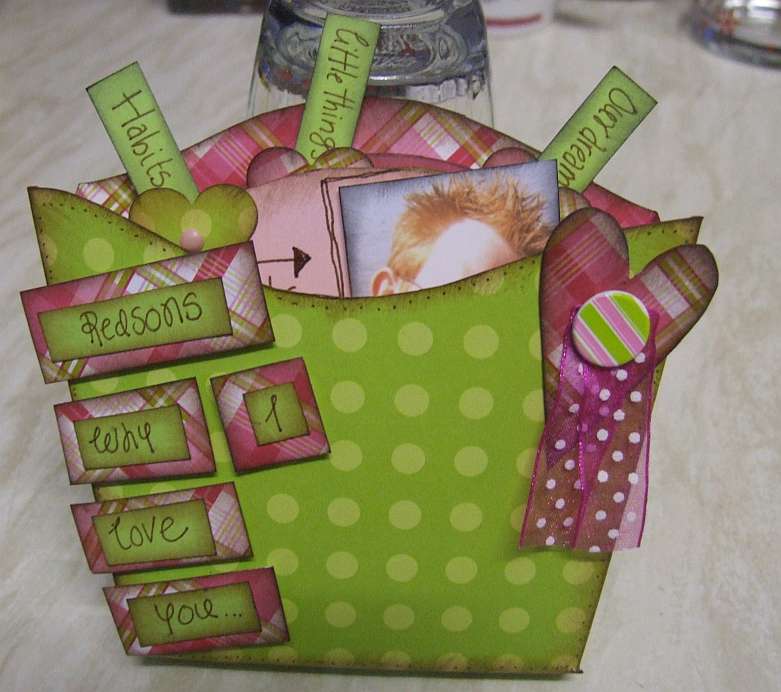
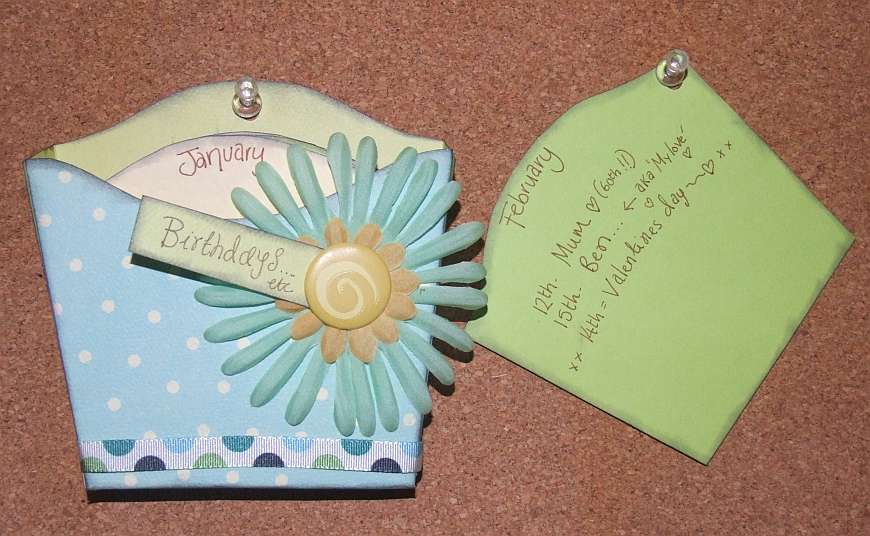
The one, which is explained in step by step pictures on the slide show is really a Minibook in its own way, as I created inserts which tell a story each about the TV shows I used to love watching when I was a child. At the end of the slideshow you will see two different examples on how to decorate your containers. And have a looksey what Sarahjane did to her container!!!

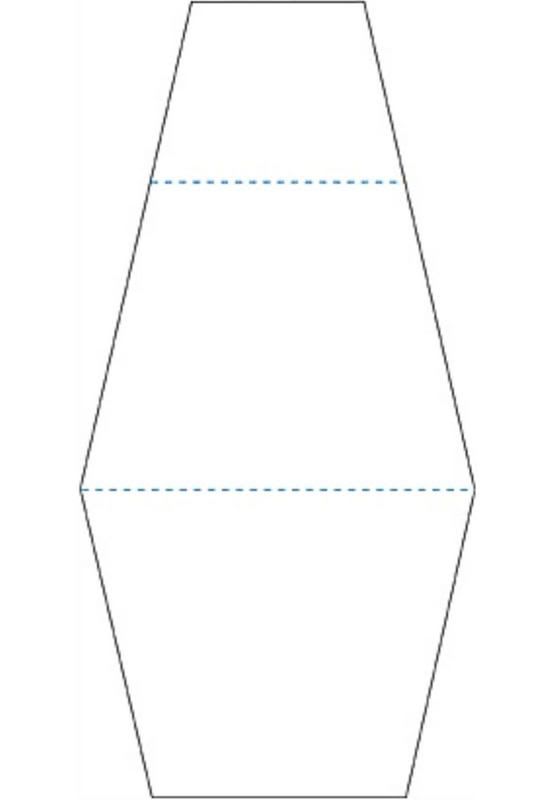
First of you will need to print out this template. You can change the size if you copy and paste the picture into word. You can then drag the edges and make it larger or smaller.

Photobucket - Video and Image Hosting

Here it goes - this is what you will need to do:

1. Print and cut out the template then place it onto a sheet of cardstock or paper (I prefer double sided paper, but this is not mandatory). Trace the outline of the template and cut it out.

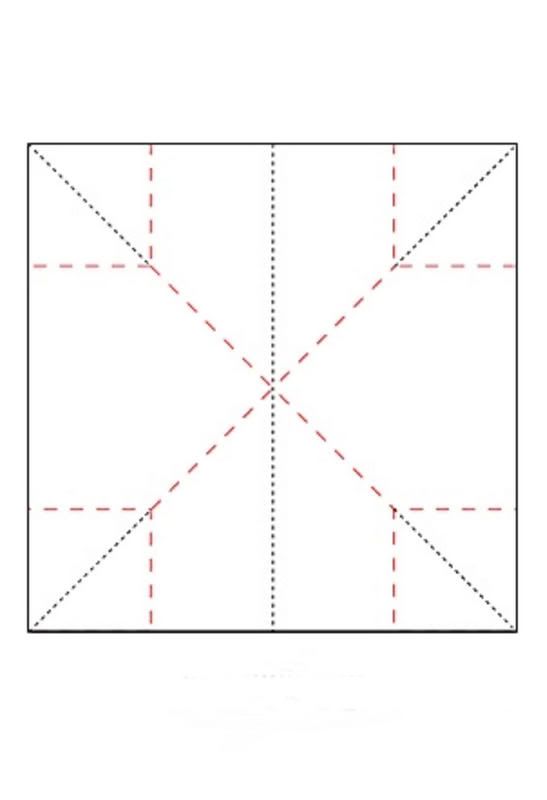
2. Place the tempate on top of your cut-out and use a scoring tool and a ruler to go across the scoring lines.

3. Fold along the scored lines and place some glue (I prefer double sided tape) on the shorter lip of the folds. Press together and you have your box ready to decorate! (Told you it was quick!)

4. If you want to make inserts, trace the bigger half of the template (minus the folding lips) onto cardstock and cut it out. You might need to trim a little off the bottom and the sides of the inserts, which you can determine by trying to fit it into your container. It should slide in smoothly, if it doesn't -> you will need to trim the sides a little.

5. Decorate the inserts as you wish, or simply fill the container with sweets or other goodies. Just imagine, you could RAK a scrapping friend by filling one of these up with ribbons, blooms and other embellies.

Now have fun creating and don't forget to link us back to your finished project!
You can purchase a ready made Kit for these containers {here}


Here is was Sarahjane did with the fries container - simly divine!

Friday, December 15, 2006

challenge # 1

Welcome To Our first challenge!
We chose Explosion Boxes - as these have been SO popular and some people STILL haven't found the time to do one.. or worry that its "too hard" to do.
Im gonna wipe that theory out - and promise you that once you have done one you won't be able to stop - cos they are so darn coolio!
The measurements of this box have been edited from other sites - and can be found below in the instructions.
So the challenge is:
CHALLENGE: Make from scratch and fill an exploding Box -BY: 29th Dec (make before and give at christmas!!)INCLUDE: As many "bits" as you can - blooms, brads, chipboard.. make it 3D, fun and Inspirational to those you show it too!!!
Here are some step by step instructions and a slideshow to show you how...
THE BOX1: You will need a trimmer/ruler and a scorer (the old emboss tools work really well if you have one of these knocking about!) 3 sheets of bazzill, one measuring 9 x 9 inches, one 10x10 inches and one 11x11 inches. You will also need some patterned paper or card measuring 7.8 x 7.8 inches (see slide)2: First you will need to score your 9" square at 3" intervals.Always make sure you measure from each edge of the card - not from the middle.3: Now cut off the 4 edge corners to leave a cross shape (see slide)You now have your "inner" explosion.4: Now take your 10" and score at 3.3" intervals *remember to measure from each edge In - not from middle*5: Cut the four corners off leaving your cross shape. You now have your "middle" explosion6: Take your 11" square and score it at 3.6" intervals.*remember to measure from each edge In - not from middle*7: Cut the four corners off leaving your cross shape. You now have your "outer" explosion - the one you will see when the box is closed7: Glue your explosions together. - this is the base part of your box.Now for the Lid1: Take your 7.8" square - and score 2" from each edge. *see slide* You will the two inches is the "lip" of the lid. This will hold your explosions together nice and snuggly.2: once you have scored the 2" lines - score the corners diagonally (see slide)3: Pinch these corners Inwards and glue down.You now have the lid...

HERES HOW:


easy? I hope you thought so.... Scrappyfairy.co.uk have some limited edition exploding box kits, there are only two of each! so If you want one grab one today! CLICK HERE


KIMMY 'S

Photobucket - Video and Image Hosting

SARAHJANE'S
Photobucket - Video and Image Hosting
Now Its your turn... Link back and play!!!
Welcome to our new blog. Once A month either myself or the fabulously talented Kimmy Sonksen will post an inspiration challenge.These "inspirational challenges" go LIVE Monthly on the 15th.
Myself and Kimmy will show you examples of our work to match the challenge - And sometimes.. you may be lucky enough to see guests come along and inspire you too!
Please say you'll play!The first challenge will run on Friday 15th at 9pm.
Come back -get inspired- and link us to your creations!
Website Traffic Tracking
Gevalia Coffee
Crafty Blogs